
See Notes about the instructions.
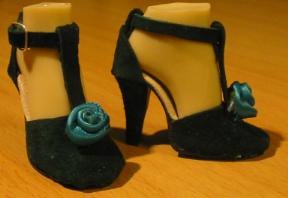
This is an inexpensive way of making soles for doll shoes.
You need copper sheet that is thin enough to cut with scissors, but thick enough to keep its form when bent. You also need small pieces of leather for the inner and outer soles. The inner sole pieces can be relatively thin. Their color could be, for example, white, beige, silver or gold. The outer sole pieces should be thicker and their color could be, for example, black or beige.
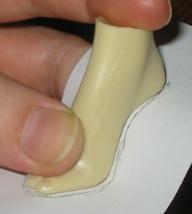
Start by tracing the shape of the doll foot on paper. Press the paper to the foot and draw the outline. Remove the paper and shape the toe of the sole. When the shape is what you want, cut out the pattern and place in on the copper sheet. Copy the outline to the copper sheet.
If you have a universal pattern (same for both feet), make two similar outlines. If the left and right soles are different, flip the pattern after copying the first outline on the copper sheet and make the second one a mirror image of the first.
Cut out the outlines you made on the copper sheet. Cut from the inside of the line you drew on the sheet as the copper soles need to be a bit smaller than the inner and outer soles.

Use the paper pattern to cut the inner and outer soles from leather in the same way. Make these pieces slightly larger than the copper soles and the outer soles also a bit longer (you can cut out any excess later). This way, when the pieces are glued together, the copper will not show in the edges. When tracing and cutting, remember to check which side of the material will be visible.
Let's say that the side that is towards the doll's foot is side A and the underside is side B. With the inner sole, the side that remains visible is side A. With the outer sole, side B will remain visible. So you should flip the pattern accordingly. If this sounds confusing, just put the layers on top of each other before cutting and see which way they should be.
Use the doll's foot or foot last to bend the copper soles to the desired shape.

Spread glue to an outer sole piece (side A) and glue it to the underside of a copper sole. Try not to bend the copper sole out of shape. Do this for both copper soles. If left and right soles are different, make sure that you match the correct copper and leather pieces.

With the inner sole, you have two options:
1) If you are making sandals: Spread glue to the middle of an inner sole piece (side B, lengthwise) and glue it to the upper side of a copper sole. The purpose is to leave the edges unglued at this stage. Fix the ribbons of the sandals, tuck the ends between the inner sole and copper sole in desired places and glue them. Finally, glue the edges of the soles by spreading glue between the layers with a toothpick.
2) For all types of shoes: Attach the upper sole to the foot or foot last with a rubber band or adhesive tape. Glue the edges of the upper parts of the shoe to the underside of the inner sole. When finished, glue the inner sole to the copper sole. You may find it easier to work with the inner sole if you glue a piece of cardboard on the underside of it (make the cardboard the same size as the copper sole).


Finally, you need heels for the shoes. You can use wood, modeling clay, plaster, metal, tubular beads, whatever has the correct length and shape. Use pictures of real shoes as a guide to the size and position of the heel. Here is an example of making the heels.


Glue the heels to the shoes. If copper is showing somewhere, you can use paint to cover it. Any other imperfections can usually be covered with something like bows, ribbons, beads, etc.